Intro
Hi All.
Today I would like to write about an AWS finger practice.
Previously, I wrote about how I build and deploy my blog with Wercker. Since, I’m a cloud engineer and I dislike Oracle and it’s ever expending tenctacles into the abyss, I wanted to switch to use something else.
My build and deploy cycle is simple.
Commit to Blogsource Repo -> Wercker WebHook -> Builds my blog using Hugo -> Pushed to a Different Repository which my Github Blog.
That’s all.
It’s quiet possible to reproduce this on AWS without infering costs. Unless you publish like… a couple 100 posts / week.
I’m going to use the following services: CloudFormation, AWS Lambda, CodeBuild, S3.
To deploy the below describe architecture in your account in us-east-1 region simply click this button:

BEFORE doing that though you need the following created:
Have a bucket for your lambda function. The lambda function can be found here:
Zip up the lambda folder contents by doing this:
cd lambda
zip -r gitpusher.zip *
aws s3 cp gitpusher.zip s3://your-lambda-bucket
That’s it.
To read a description of the stack, please continue.
TL;DR;
The architecture I’m about to lay out is simple in its use and design. I tried not to complicate things, because I think the simpler something is, the less prone to failure it will be.
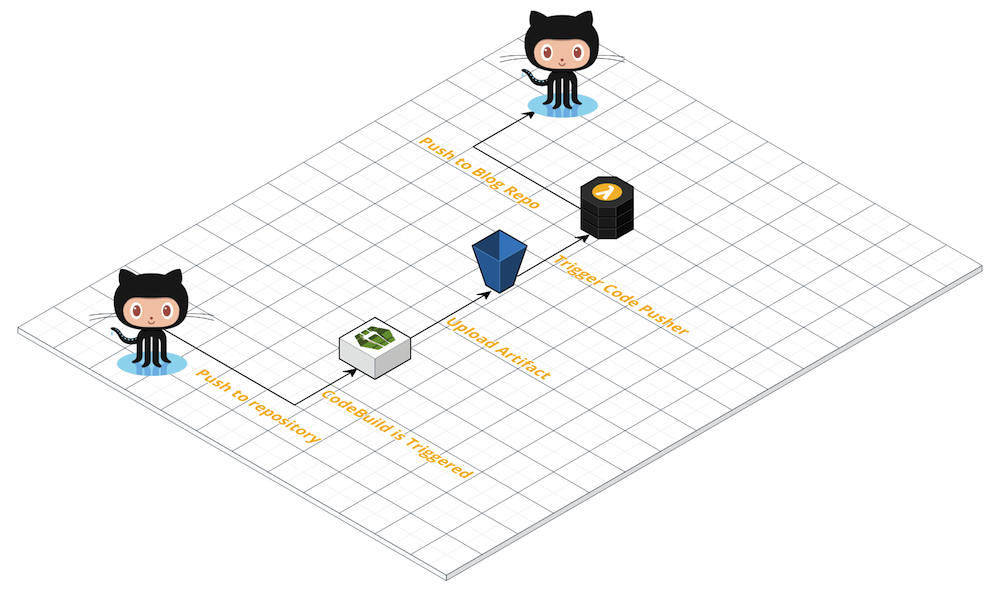
In its most basic form the flow is as follows:
 .
.
You push something into a repository you provide. CodeBuild has a webhook to this repository so on each commit it starts to build the blog. The build will use a so called buildspec.yaml file which describes how your blog should be built. Mine looks like this:
version: 0.2

phases:
  install:
    commands:
      - echo Installing required packages and Hugo
      - apt-get update
      - apt-get install -y git golang wget
      - wget -q https://github.com/gohugoio/hugo/releases/download/v0.31/hugo_0.31_Linux-64bit.deb -O /tmp/hugo.dep
      - dpkg -i /tmp/hugo.dep
  pre_build:
    commands:
      - echo Downloading source code
      - git clone https://github.com/Skarlso/blogsource.git /opt/app
  build:
    commands:
      - echo Build started on `date`
      - cd /opt/app && hugo --theme purehugo
  post_build:
    commands:
      - echo Build completed on `date`
artifacts:
  files:
    - /opt/app/public/**/*
When it’s finished, CodeBuild will upload everything in the public folder as a zip to a bucket. The bucket has a lambda attached which triggers on putObject event with the extension .zip. It downloads the archive, extracts it and pushes it to another repository, which is the repository for the blog.
And done! That’s it. For an architecture overview, please read on.
Architecture
Now, we are going to use CloudFormation stack to deploy these resources. Because we aren’t animals to create them by hand, yes?
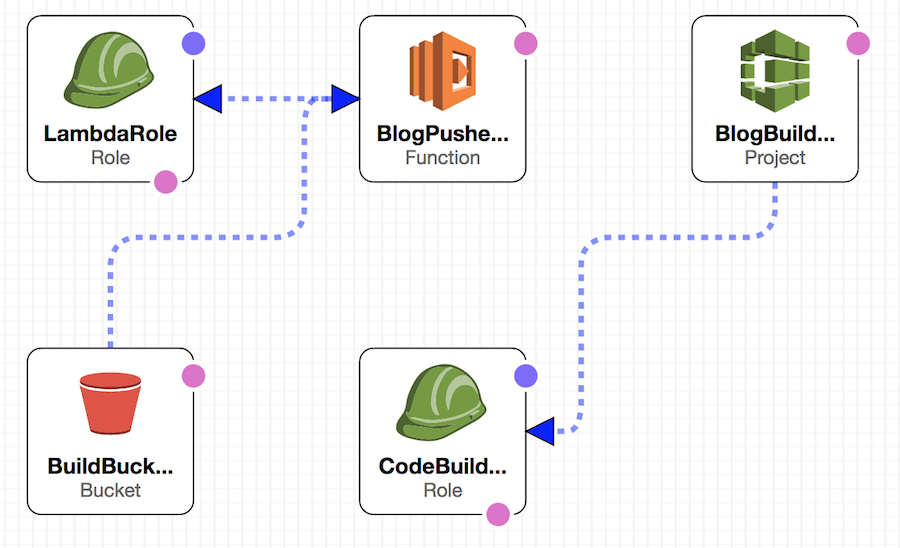
An overview of my current architecture is best shown by this image:
 .
.
Let’s go over these components one - by - one.
Lambda Role
This is the Role which allows the Lambda to access things in your account. It needs the following service access: s3, logs, lambda; and the following permissions: logs:Create*, logs:PutLogEvents, s3:GetObject, s3:ListBucket.
Code Build Role
This is the role which allows CodeBuild to have access to services it needs. These services are the following: s3, logs, ssm, codebuild. CodeBuild also needs the following actions allowed: logs:Create*, logs:PutLogEvents, s3:GetObject, s3:PutObject, ssm:GetParameters.
Build Bucket
This is the bucket in which CodeBuild will push the generated build artifact.
Blog Pusher Function
This is the heart of this project. It contains the logic to download the zipped artifact, extract it, create a hollow repository from the extracted archive and push the changes to the repository. And just the changes.
This is achieve by a short Python 3.6 script which can be found in the linked repository.
Parameters
The stack requires you to provide a couple of parameters which are described in the template. Like, bucket name, github repository, git token and such. Please refer to the template for a full description of each.
Charges
I recently push a couple of builds to test this configuration and I inferred 0.2 USD in charges. But that was like 10-15 builds a day.
Deploying
In order to deploy this you can use Furnace to easily manage the template and it’s parameters. Once you copy the template to the target directory, simply run furnace aws create and provide the necessary parameters.
Conclusion
And that is all. A nice little stack which does the same as Wercker without costs but the leisure of simply pushing up some change to a repository of your choosing.
I hope you enjoyed this little write up as much as I enjoyed creating it.
As always, Thanks for reading! Gergely.