Hi Folks.
Intro
Today, I wanted to write about how to create a secure server in a container. Ideally, you don’t want to run your server on your own machine. Running it in a container gives you a much needed control and an extra layer of security.
Docker On OSX
While on a mac, you have a couple of options to run docker.
Docker-Machine
Docker machine is very simple. It just creates a Linux vm in the background on the given driver, for us it will be VirtualBox. Network, Memory and port-forwarding can all be managed through the VM directly. Then running and starting it is trivial through docker-machine start.
Boot2Docker
Runs a tiny linux in which you can use Docker freely. This adds the benefit of not having to mess around with VirtualBox.
DLite
DLite is the newest addition in the Game. Since docker uses /var/run/docker.sock file to communicate with the daemon, and this file is not there on OSX, DLite takes care of that. After DLite is running, you just simply use Docker. That’s it. No VM, no fuss, just use Docker.
I recommend to use DLite, however, it’s not an official tool, so for the sake of this guide, I’ll be writing up a docker-machine oriented solution.
Docker container - A Vanilla Server
First, you’ll need a Dockerfile. Dockerfile. The steps on how to setup this file are written down in the README file, located here: Container Setup. The pwd command will use your current directory as a shared volume to copy stuff into the container from your host operating system.
This will download the Minecraft server version 1.9 (or whichever you define) and install java and vim. It uses /data as a shared folder. Data will also be the working directory which means we will run the server from there. This server will be a vanilla server, meaning, no modding. If you have a single player world which you would like to use, simply copy that to /data and rename it to world.
The tricky part is to make this available on the internet. Because the container is in a VM we need to do a chain forwarding. Forward from the container to the vm, and from the vm to your host machine. If you are using a dns service like dyna or no-ip, you probably have a software which refreshes an IP for you to link to. And you’ll also have port forwarding setup on your router. I won’t be going into detail on that part. That’s a whole different post.
Forwarding from virtualbox can be done through the UI or through command line. The UI is like this: Settings => Network => Adapter 1 => Advanced => PortForwarding. Here, setup something like this: Name: Minecraft; Protocol: TCP; Host IP: 192.168.0.X(x=your local machine); Host Port: 25565; Guest IP: Leave Blank; Guest Port: 25565.
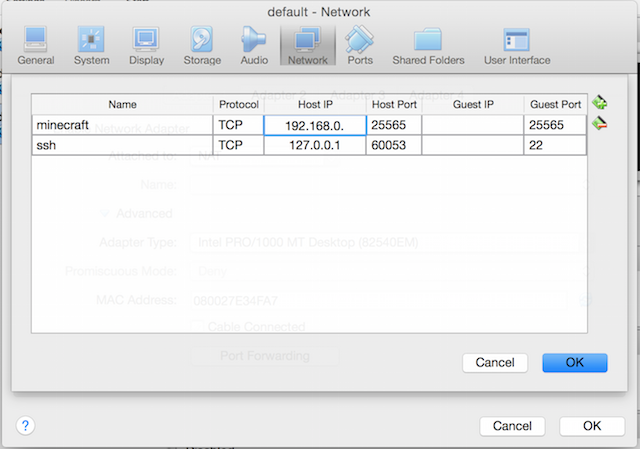 Where the number is missing, you’ll have to define your own local IP which you are using for your domain address.
This should forward any ports coming from your VM to your local IP. In the container we have an expose and as the README states it’s started using -p 25565:25565 which will make sure that from the container, 25565 is exposed to the VM. And from the VM 25565 is exposed to your local. Chain forwarding.
After that, once you start your server, it should all click together and you should have a running vanilla Minecraft server available under http://yourdomain:25565. You won’t be able to check this by default on your own network. Check if the port is open with a different service like: Check If Port is Open.
Docker container - Modding
If you are not looking for anything, just a simple server, the above will be enough. You can still do /tp 1 1 1 to teleport, or can still use bans and op commands, and distribute items. However, if you would like to use mods, and as far as kids are concerned, they will want it, you’ll have to be a bit more clever.
I dug far and deep and found that you have two options. Either go with a Forge server, or a Bukkit server. What does that mean? The vanilla server of Minecraft does not support modding. Modding, is modifying the implementation of Minecraft. It injects code and runs a pre-server in front of the original Minecraft server in order to append functionality. But fret not, this is all taken care of for you by either solutions.
In order to jump into our container with the CMD omitted, we’ll have to run the following command instead of the one in the README.
docker run -it -v `pwd`:/data -p 25565:25565 --name mc_server minecraft:v1.9 bash
This will give you an interactive prompt in which now we can operate.
Forge
Download the latest forge version from here => Minecraft Forge. They are usually up-to-date. I’m using 1.9 so I downloaded the appropriate installer version. After I obtained it, it was a matter of running this piece of command line code from my container:
java -jar forge-1.9-12.16.0.1813-1.9-installer.jar --extract --installServer
This will unpack a bunch of things you don’t have to worry about in your current directory, which is /data. Now run the universal.
java -jar forge-1.9-12.16.0.1813-1.9-universal.jar
Everything under the mods folder will be loaded as a mod. Forge is very restrictive and can only use Forge based mods. It will usually warn you if you have a none forge mod in your mods folder. You can find these on Forge’s forum here: Forge Forum. Simply download a jar and put it into /data/mods.
Bukkit
I found Bukkit to be the winner for me. Most of the mods the kid wanted worked with Bukkit and did not work with Forge. Others will swear on Forge, but it’s really up to you. Using Bukkit is similarly easy. Again, you’ll have to find and get the wrapper for your Minecraft version, which can be located here: GetSpigot. You can use Spigot as well, though I have no experience with that.
Once, you got the wrapper, which is called craftbukkit-1.9.jar for me, you run it the same way you would run Forge or Minecraft.
java -jar craftbukkit-1.9.jar
This will load mods from the plugins folder. Plugins can be found here: Latest Bukkit Plugins.
In the container, you can use wget or curl to get the mods, or simply use the shared volume which is setup for you.
Last Words
All in all this sounds complicated, but it’s actually not, once you’ll get the hang out of it. You never kill the container once it’s setup, you just do docker stop mc_server and then docker-machine stop if you want to stop the VM as well. To start it up simply do these steps:
docker_machine start
eval $(docker-machine env)
docker start mc_server
We named the container mc_server on a previous step. If you named it something different, use that name.
That’s it. Hope this was clear. Any feedback is appreciated. If you think you have an easier way, or if I wrote something incorrectly, feel free to tell me in the comment sections below.
Thanks for reading.
Gergely.